vue项目中实现拖拽穿梭框有哪些方法,代码是什么
Admin发表于 2022-11-12 17:41:31466 次浏览
 在这篇文章中我们会学习到关于“vue项目中实现拖拽穿梭框有哪些方法,代码是什么”的知识,小编觉得挺不错的,现在分享给大家,也给大家做个参考,希望对大家学习或工作能有帮助。下面就请大家跟着小编的思路一起来学习一下吧。
一、使用原生js实现拖拽
点击打开视频讲解更加详细
<html>
    <head>
      <meta charset="UTF-8" />
      <title>Lazyload</title>
      <style>
        .drag {
          background-color: skyblue;
          position: absolute;
          line-height: 100px;
          text-align: center;
          width: 100px;
          height: 100px;
        }
      </style>
    </head>
    <body>
      <!-- left和top要写在行内样式里面 -->
      <div style="left: 0; top: 0">按住拖动</div>
      <script src="./jquery-3.6.0.min.js"></script>
      <script>
        // 获取DOM元素
        let dragDiv = document.getElementsByClassName('drag')[0]
        // 鼠标按下事件 处理程序
        let putDown = function (event) {
          dragDiv.style.cursor = 'pointer'
          let offsetX = parseInt(dragDiv.style.left) // 获取当前的x轴距离
          let offsetY = parseInt(dragDiv.style.top) // 获取当前的y轴距离
          let innerX = event.clientX - offsetX // 获取鼠标在方块内的x轴距
          let innerY = event.clientY - offsetY // 获取鼠标在方块内的y轴距
          // 按住鼠标时为div添加一个border
          dragDiv.style.borderStyle = 'solid'
          dragDiv.style.borderColor = 'red'
          dragDiv.style.borderWidth = '3px'
          // 鼠标移动的时候不停的修改div的left和top值
          document.onmousemove = function (event) {
            dragDiv.style.left = event.clientX - innerX + 'px'
            dragDiv.style.top = event.clientY - innerY + 'px'
            // 边界判断
            if (parseInt(dragDiv.style.left) <= 0) {
              dragDiv.style.left = '0px'
            }
            if (parseInt(dragDiv.style.top) <= 0) {
              dragDiv.style.top = '0px'
            }
            if (
              parseInt(dragDiv.style.left) >=
              window.innerWidth - parseInt(dragDiv.style.width)
            ) {
              dragDiv.style.left =
                window.innerWidth - parseInt(dragDiv.style.width) + 'px'
            }
            if (
              parseInt(dragDiv.style.top) >=
              window.innerHeight - parseInt(dragDiv.style.height)
            ) {
              dragDiv.style.top =
                window.innerHeight - parseInt(dragDiv.style.height) + 'px'
            }
          }
          // 鼠标抬起时,清除绑定在文档上的mousemove和mouseup事件
          // 否则鼠标抬起后还可以继续拖拽方块
          document.onmouseup = function () {
            document.onmousemove = null
            document.onmouseup = null
            // 清除border
            dragDiv.style.borderStyle = ''
            dragDiv.style.borderColor = ''
            dragDiv.style.borderWidth = ''
          }
        }
        // 绑定鼠标按下事件
        dragDiv.addEventListener('mousedown', putDown, false)
      </script>
    </body>
  </html> 登录后复制
二、VUe使用js实现拖拽穿梭框
<template>
  <div>
    <h3 style="text-align: center">拖拽穿梭框</h3>
    <div id="home" @mousemove="mousemove($event)">
      <div class="tree-select-content">
        <span
          class="select-content"
          :id="'mouse' + index"
          v-for="(item, index) in leftData"
          :key="item.id"
          @mousedown="mousedown(index, 1)"
          @mouseup="mouseup(item, 1, index)"
        >
          <span class="select-text">{{ item.label }}</span>
          <span class="select-text-X" @click="handerClickX(item, index, 1)"
            >X</span
          >
        </span>
      </div>
      <div class="tree-select-content">
        <span
          class="select-content"
          :id="'deleteMouse' + index"
          v-for="(item, index) in rightData"
          :key="item.id"
          @mousedown="mousedown(index, 2)"
          @mouseup="mouseup(item, 2, index)"
        >
          <span class="select-text">{{ item.label }}</span>
          <span class="select-text-X" @click="handerClickX(item, index, 2)"
            >X</span
          >
        </span>
      </div>
    </div>
  </div>
</template>

<script>
export default {
  name: "home",
  data() {
    return {
      leftData: [
        { label: "首页", id: 1 },
        { label: "咨询", id: 2 },
        { label: "生活", id: 3 },
        { label: "财富", id: 4 },
        { label: "我的", id: 5 },
      ],
      rightData: [{ label: "世界", id: 6 }],
      isMoveTrue: false,
      isMove: false,
      moveId: "",
    };
  },
  mounted() {},
  components: {},
  methods: {
    mousedown(index, val) {
      this.isMoveTrue = true;
      if (val == 1) {
        this.moveId = "mouse" + index;
      } else {
        this.moveId = "deleteMouse" + index;
      }
    },
    mousemove(event) {
      if (this.isMoveTrue) {
        this.isMove = true;
        document.getElementById(this.moveId).style.position = "absolute";
        document.getElementById(this.moveId).style.top = event.clientY + "px";
        document.getElementById(this.moveId).style.left = event.clientX + "px";
        document.getElementById(this.moveId).style.transform =
          "translate(-50%,-50%)";
      }
    },
    mouseup(item, val, index) {
      if (!this.isMove) {
        this.isMoveTrue = false;
        this.moveId = "";
      }
      if (this.isMoveTrue && val == 2) {
        this.$nextTick(() => {
          this.rightData.splice(index, 1);
          this.leftData.push(item);
        });
      } else if (this.isMoveTrue && val) {
        this.leftData.splice(index, 1);
        this.rightData.push(item);
      }
      document.getElementById(this.moveId).style.display = "none";
      this.isMoveTrue = false;
      this.isMove = false;
      this.moveId = "";
    },
    handerClickX(item, index, val) {
      if (val == 1) {
        this.leftData.splice(index, 1);
        this.rightData.push(item);
      } else {
        this.rightData.splice(index, 1);
        this.leftData.push(item);
      }
    },
  },
};
</script>

<style scoped>
#home {
  display: flex;
  justify-content: space-around;
}
.tree-select-content {
  width: 40%;
  height: 300px;
  background: #f9faff;
  border: 1px solid #dee0ec;
  border-radius: 4px;
  display: flex;
  flex-wrap: wrap;
  align-content: baseline;
}
.select-content {
  width: max-content;
  height: 20px;
  padding: 1.6%;
  border: 1px solid #d6dbed;
  margin: 2% 1% 0;
  background: #ffffff;
  box-shadow: 0 0 8px 0 rgba(72, 119, 236, 0.1);
  border-radius: 4px;
}
.select-content:hover span {
  color: #4877ec;
}
.select-content:hover {
  cursor: pointer;
  background: #f8faff;
  border: 1px solid #3e75f4;
}
.select-text {
  font-size: 15px;
  color: #2e2f36;
  text-align: center;
  font-weight: 400;
}
.select-text-X {
  font-size: 15px;
  color: #4877ec;
  letter-spacing: 0;
  font-weight: 400;
  margin-left: 12px;
  cursor: pointer;
}
</style> 登录后复制
效果图: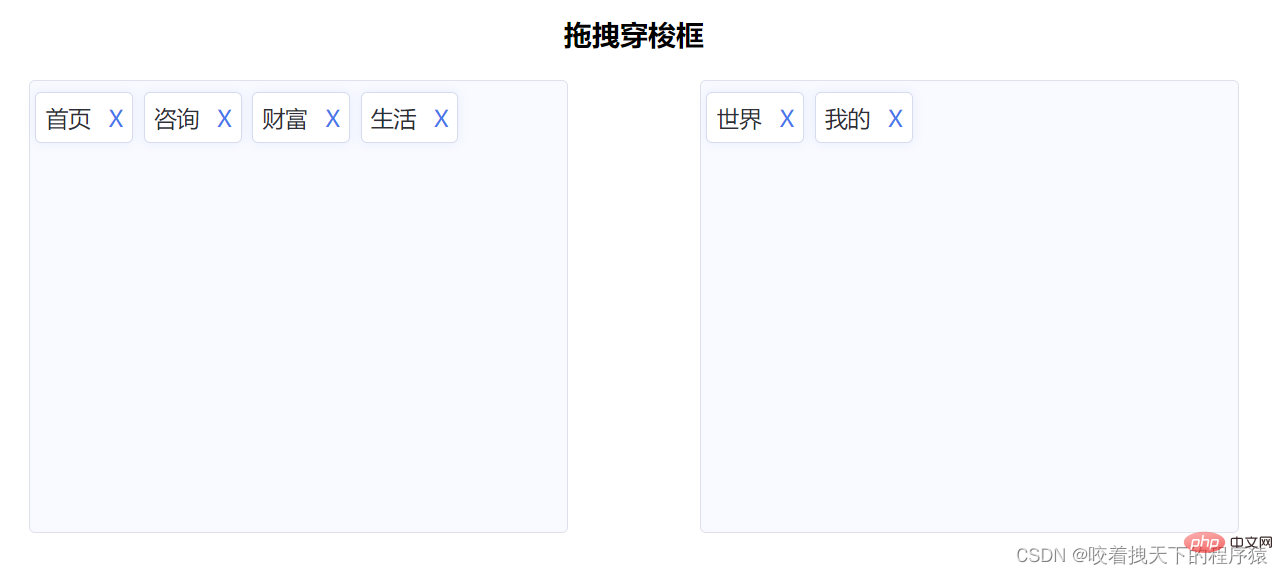
三、Vue 拖拽组件 vuedraggable
vuedraggable 是标准的组件式封装,并且将可拖动元素放进了 transition-group 上面,过渡动画都比较好。【相关推荐:vuejs视频教程】
使用方式:
yarn add vuedraggable

import vuedraggable from 'vuedraggable'; 登录后复制
在使用的时候,可以通过 v-model 来双向绑定本地 data,如果需要更新或者是触发父组件监听的事件,可以在 updated() 中去 emit。
案例:
<template>
  <div>
    <div>{{ drag ? "拖拽中" : "拖拽停止" }}</div>
    <!--使用draggable组件-->
    <draggable
      v-model="myArray"
      chosenClass="chosen"
      forceFallback="true"
      group="people"
      animation="1000"
      @start="onStart"
      @end="onEnd"
    >
      <transition-group>
        <div class="item" v-for="element in myArray" :key="element.id">
          {{ element.name }}
        </div>
      </transition-group>
    </draggable>
    <div class="color-list">
      <div
        class="color-item"
        v-for="color in colors"
        v-dragging="{ item: color, list: colors, group: 'color' }"
        :key="color.text"
      >
        {{ color.text }}
      </div>
    </div>
  </div>
</template>
  <style scoped>
/*被拖拽对象的样式*/
.item {
  padding: 6px;
  background-color: #fdfdfd;
  border: solid 1px #eee;
  margin-bottom: 10px;
  cursor: move;
}
/*选中样式*/
.chosen {
  border: solid 1px #3089dc !important;
}
</style>
  <script>
//导入draggable组件
import draggable from "vuedraggable";
export default {
  //注册draggable组件
  components: {
    draggable,
  },
  data() {
    return {
      drag: false,
      //定义要被拖拽对象的数组
      myArray: [
        { people: "cn", id: 10, name: "www.itxst.com" },
        { people: "cn", id: 20, name: "www.baidu.com" },
        { people: "cn", id: 30, name: "www.taobao.com" },
        { people: "us", id: 40, name: "www.yahoo.com" },
      ],
      colors: [
        {
          text: "Aquamarine",
        },
        {
          text: "Hotpink",
        },
        {
          text: "Gold",
        },
        {
          text: "Crimson",
        },
        {
          text: "Blueviolet",
        },
        {
          text: "Lightblue",
        },
        {
          text: "Cornflowerblue",
        },
        {
          text: "Skyblue",
        },
        {
          text: "Burlywood",
        },
      ],
    };
  },
  methods: {
    //开始拖拽事件
    onStart() {
      this.drag = true;
    },
    //拖拽结束事件
    onEnd() {
      this.drag = false;
    },
  },
};
</script> 登录后复制
四、Awe-dnd指令封装
vue-dragging 的 npm 包的名字是 awe-dnd ,并不是 vue-dragging,这个库的特点是封装了 v-dragging 全局指令,然后通过全局指令去数据绑定等。
相比及 vuedraggable 来说, awe-dnd 是没有双向绑定(这里没有双向绑定并不是很严谨,准确的来说没有暴露双向绑定的方式),因此提供了事件,在拖拽结束的时候用来更新列表(不需要手动更新列表,其实内部是实现了双向绑定的)或者是去触发父组件监听的事件。
安装依赖:
npm install awe-dnd --save
yarn add awe-and 登录后复制
main.js
import VueDND from 'awe-dnd'

Vue.use(VueDND) 登录后复制
案例:
<template>
  <div>
    <div class="color-list">
      <div
        class="color-item"
        v-for="color in colors"
        v-dragging="{ item: color, list: colors, group: 'color' }"
        :key="color.text"
      >
        {{ color.text }}
      </div>
    </div>
  </div>
</template>
<style scoped>
/*被拖拽对象的样式*/
.item {
  padding: 6px;
  background-color: #fdfdfd;
  border: solid 1px #eee;
  margin-bottom: 10px;
  cursor: move;
}
/*选中样式*/
.chosen {
  border: solid 1px #3089dc !important;
}
</style>
<script>
export default {
  data() {
    return {
      drag: false,
      colors: [
        {
          text: "Aquamarine",
        },
        {
          text: "Hotpink",
        },
        {
          text: "Gold",
        },
        {
          text: "Crimson",
        },
        {
          text: "Blueviolet",
        },
        {
          text: "Lightblue",
        },
        {
          text: "Cornflowerblue",
        },
        {
          text: "Skyblue",
        },
        {
          text: "Burlywood",
        },
      ],
    };
  },
  methods: {},
};
</script>
感谢各位的阅读,以上就是“vue项目中实现拖拽穿梭框有哪些方法,代码是什么”的内容了,通过以上内容的阐述,相信大家对vue项目中实现拖拽穿梭框有哪些方法,代码是什么已经有了进一步的了解,如果想要了解更多相关的内容,欢迎关注群英网络,群英网络将为大家推送更多相关知识点的文章。
免责声明:本站发布的内容(图片、视频和文字)以原创、转载和分享为主,文章观点不代表本网站立场,如果涉及侵权请联系站长邮箱:mmqy2019@163.com进行举报,并提供相关证据,查实之后,将立刻删除涉嫌侵权内容。
标签:
vue拖拽穿梭框
相关信息推荐
2022-06-28 17:13:42
2022-05-26 17:09:44
2022-07-04 17:14:52

2022-12-14 11:21:38
2022-08-19 17:53:01
2022-08-19 17:51:59
vue拖拽穿梭框
python 统计次数
java表白爱心
modal手动关闭
MessasgePack
ORACLE数据库应用开发
Java分布式事
python类属性和实例属性
多列求和
获取当前时间
dll是什么文件
Spring Bean标签
mysql修改表类型报错
oracle修改字段的值
全局配置axios
fancybox关闭按钮
pandas对齐运算
Java启动线程
zabbix内网监控
表和数据库的关系
form
decimal
php数组返回指定元素
xorm生成model
lnmp
linux env命令
oracle加表空间
php数组键值
c语言求平均成绩
WebSocket
2022-02-25 17:19:26
2022-01-24 19:23:44
2022-01-04 18:53:44
2022-01-26 18:39:38
2021-11-20 17:46:01
2022-01-18 18:00:09
2022-01-13 18:58:11
2022-01-24 19:23:57
2021-11-22 17:53:55
2021-11-20 17:45:40

群英网络助力开启安全的云计算之旅


Copyright © QY Network Company Ltd. All Rights Reserved. 2003-2019 群英网络 版权所有 茂名市群英网络有限公司
增值电信经营许可证 : B1.B2-20140078 粤ICP备09006778号


